

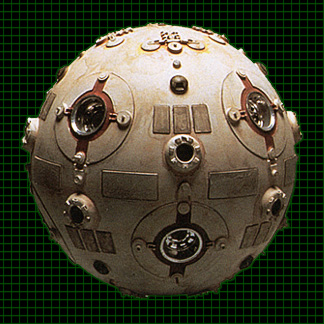
EPISODE IV: A NEW HOPE
Used by: Luke Skywalker
Those of you who do not know, the models used in Star Wars were scratch built with a technique known as "kit bashing". Kit bashing is when a hybrid object is made by using parts and pieces from existing kits. The process is very tedious, and time consuming. In many cases, only one part may be used from a very expensive kit. Another problem for the aspiring Star Wars model builder, is the many of the kits used in production are no longer available. Recently, many kits that that were used in 1977 have been re-issued. So keep an eye out for those rare ones you thought were lost forever.
PARTS
What are they? Most of the photos here are of parts that have been already molded, cast, and assembled. However, here is a photo of the parts before they were molded. As you review the parts listed below, refer to the photo of the actual film used prop at top for reference.

The prop was made from only a few kits. While it is impossible to tell which exact kits were used in 1977, the parts can be identified to kits currently available. Many kits have been sold to other model companies and re-issued under different names. Three of the pieces are hatches and tank treads from a 1/48 Tamiya Panther "Type G" tank model. The kit I used was FUMAN # 6. The first tank part is the round commander’s "cupola" and was part number D15 in my kit (cupola photo).
The Panther tank treads (tread photo) are part number B4. The Gun port from the same Panther kit and is part number D26 (gunport photo).
There is a "muffler baffle" that is located just above the gun port (baffle photo) that has been turned upside down and attached.
The 8 chrome truck rims (rim photo) are from a 1/24 Trailer model that can be found in most truck kits. I found the rims and the 8 axle brackets in ERTL's KENWORTH T-600, kit # 6976. Truck axle bracket is also in this kit (bracket photo).
The detail pieces to the left and right of the chrome truck rim on the prop are copies of piece #3 from the 1/48 Panther tank kit.
Tamiya 1/48 Panther "Type G"- part #3
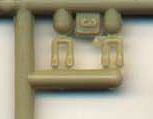
The other parts located next to the Panther part #3's are wheel pieces from a 1/72 scale M-4(A3E8) Sherman tank model by Hasegawa. They are parts 12 and 13 in the kit, a pair of the parts would make one wheel. The male wheel halves (with solid posts) were used in the upper section of the training remote while the female halves (tube posts) were used in the lower section.

Hasegawa 1/72 M-4 Sherman wheel halves
Non kit parts were made from styrene sheet. For example, sheet styrene rectangles with dimensions 6.4 x 14.3mm (rectangles photo) are positioned just above the tank cupola.
Series of rectangles spaced along the "equator". They measure 3 x 1.5 cm and are evenly spaced between the tank hatch in the northern and southern hemispheres (equator photo). The parts are all glued onto two 6 inch diameter PLASTRUCT hemispheres that have been glued together to make a ball.
PAINTING
Please note that the photos of the ball being painted here were shot using parts from the 1/35 Panther tank model. They look slightly different.
I made three remotes during my research. The third one is pictured here (myseek photo). The actual ball has faded over the years. If you have pictures from the Star Wars exhibit in DC, the colors may differ from what can be seen on screen or in earlier photos. The ball is basically an off white with heavy weathering. You can paint your ball with any technique you wish to try. Be creative!
If you glued your SCOTCH-LITE in your hatches, remember to stuff tissue paper into the hatches to protect the SCOTCH-LITE from paint. I painted the ball with Model Master’s flat white as a base coat. Letting the paint dry in between coats, I used Gunze Sangyo’s H-316 (Navy F-14, F-4) white. I like the way this paint airbrushes and this particular color is an off-white that worked for me. I then dull coat the ball with two coats of Gunze Sangyo clear flat (photo 1).
Once dry, I paint Polly S "red metal primer" (# 500006) in the recessed area around the truck rim hole. There is also red between the two "canons" (also photo 1). The tank treads look rusted. I used Windsor & Newton’s Yellow Ochre to light wash the edge of the tread (photo 2). I went back over it with a second wash (photo 3)using Windsor & Newton’s Burnt Sienna to add the red color to the rust.
Remember that post that is above the Panther gun port? The top is painted silver, leave the sides alone. The gun port is painted metallic black, or gun metal. The three rectangles below the gun port are gray (photo 6). They look worn in my reference photos, but evenly painted in the film. I used Polly-S Stone Gray (#501415). I tried to match the worn look by using a wash letting the under color show though in spots.
These photos are out of order...but this photo (photo 5) shows the series of rectangles that are along the "equator". The exact color I am not as sure of as the other colors previously mentioned. In the film they look light blue gray. In the pictures I have from the DC exhibit they look even lighter gray. I honestly have no idea and can only suggest you use what strikes you as correct depending on the reference you are using. I like a bit darker color and used Polly-S light blue gray (#505242). The color looks very even so I airbrushed it. After I paint all the rectangles on the equator, I LIGHTLY airbrush the original off white color over them to subdue them a bit. Note: final photos of the ball were taken without this step.
Photo 6 shows the ball ready for the FINAL weathering. I used Windsor & Newton’s Black giving my ball a nice black wash, dabbing it off with a rag here and there. Letting the paint "sit" for different amounts of time before you dabble off gives various intensities of stain. The Star Wars Universe has a dirty "used" look. Weather until you think it looks right. Ill have more photos up of the third ball painted later.
This page brought to you with the help and cooperation of Frank Cerney.
Frank Cerney is a Flight Officer in the in the United States Navy. He has been building models since he was 8 years old. His other passion is collecting movie props. He lives in San Diego California with his wife Kristin.
Cerney1@aol.com